The iOS might be trailing significantly behind Android, with a 27.43% market share in March 2021, but with around 900 million active iPhone users, it is still a big market and if you are among those users, you might want to know how to send and receive encrypted emails on your iPhone. This helpful article will explain how.
To learn how to encrypt an Android, check out this article.
According to Apple’s Encryption and Data Protection overview, “iOS and iPadOS devices use a file encryption methodology called Data Protection”.
Before you can start sending and receiving encrypted email on your iOS, you will need to download the certificate and import it to your device.
While managing your iOS device, optimizing its performance is equally crucial. Here, CleanMyMac X emerges as a pivotal tool. Not only does it help in removing unnecessary files, thereby freeing up space, but it also plays a significant role in maintaining your device’s health.
CleanMyMac X provides an intuitive dashboard that simplifies tracking storage, RAM usage, and battery life—all essential for keeping your iPhone running smoothly.
How to Download an S/Mime Certificate on Your iPhone or iPad?
Whether you are using iPhone or iPad, all iOS devices have built-in support for S/MIME. However, you will need to turn that on by installing a certificate from a trusted authority.
S/MIME stands for “Secure Multipurpose Internet Mail Extension”. If you’d like to know more about how it works, you can read this article on what is S/MIME and why you might need it.
Two such authorities are SSL.com and Globasign.com, but you can choose another one if you want.
Keep in mind also that digital certificates will cost you a little, but it’s a price well paid for the security of your email.
When you go to SSL.com, for instance, you will find email certificates under Products > Email, Client and Document Signing Certificates. You’ll have three options here:
- Email only;
- Email + Identity;
- Document Signing + Email.
This will cost you $20-$30 per year and will include S/MIME and Automated Validation and Enterprise Management Tools (Personal Basic), while Personal Pro also includes Identity Authentication for $30-$70/year and Business is $250-$300/year with added Organisation Authentication and Document Signing.
We’ll go with the Personal Basic version here. Since we only need the email certificate and not the Identity Authentication or the Document Signing (though these can prove useful in other situations).
Once you click Buy and provide your payment information and email address, you will receive an email with a Certificate Activation Link that you will need to install the certificate on your iOS device.
How to Import a Certificate on Your iPhone or iPad?
To import a certificate to your iOS device, open the link you received from SSL.com or other digital certificate authority and click on the link in it.
The certificate file should start importing, so allow that and save it somewhere securely.
After the .p12 file has been imported onto your device, you can proceed to the next step and install it.
Installing the S/MIME Certificate to Your iOS Device
If it isn’t already, make sure that the .p12 file is accessible from the email client on your device.
Next, tap the email with the .p12 file attached and open the attachment. This will start the certificate installation process.
When asked to “Choose a Device” select the device you want to install the profile on.
To install a profile, go to the Settings app on your iPhone and tap Profile Downloaded.
Tap Install in the upper right corner of the screen and enter your passcode if your iPhone or iPad is protected by one (it should be).
If you have a self-signed digital certificate and not one provided by a trusted digital certificate authority, you will get a warning message about this, but you can proceed by tapping Install.
You’ll then be able to install the profile by tapping Install at the bottom of your screen.
Enter the PKCS12 export/import password that you created when the .p12 file was created and tap Next.
Your profile and certificate are both now installed and you can click Done.
Once you’ve completed this, it’s time to move on to
Enabling S/MIME on Your iOS Mail
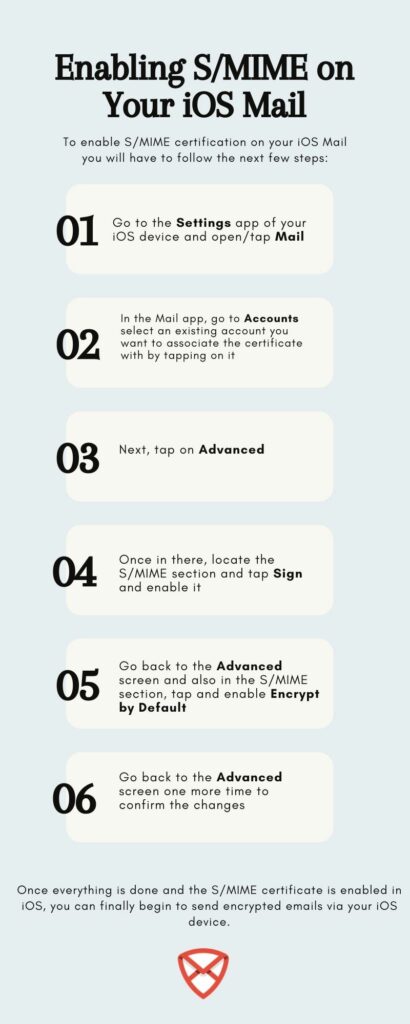
To enable S/MIME certification on your iOS Mail you will have to follow the next few steps:
- Go to the Settings app of your iOS device and open/tap Mail;
- In the Mail app, go to Accounts select an existing account you want to associate the certificate with by tapping on it;
- Next, tap on Advanced;
- Once in there, locate the S/MIME section and tap Sign and enable it;
- Go back to the Advanced screen and also in the S/MIME section, tap and enable Encrypt by Default;
- Go back to the Advanced screen one more time to confirm the changes.
Once everything is done and the S/MIME certificate is enabled in iOS, you can finally begin to send encrypted emails via your iOS device.
Exchanging Certificates with Recipients
Before that though, you will need to exchange certificates with your recipients. This is because email encryption works only if both sides (sender and recipient) have it on. If either lacks encryption, on their side, the messages will not be encrypted.
Simply send them an email and ask them to follow the same steps above before they reply. After they have done this, you should see a blue checkmark next to their email account address. In case they don’t have a signed certificate, they would have a red checkmark instead.
Tap on the blue checkmark to install the recipient’s public key to your iPhone or iPad.
On the next screen, you’ll see a message “The sender signed this message with a trusted certificate” and below that, you can tap on View Certificate to install the certificate to your iOS Keychain.
On the next screen, you’ll see the S/MIME certificate with “Trusted” in green letters. Tap on Install at the bottom of this screen and then on Done once it’s finished installing.
Sending an Encrypted Email via iOS
Here we are finally!
When sending encrypted email to someone already in your Exchange environment Mail will use GAL to detect if the other side is also using an S/MIME certificate. GAL stands for “Global Address List” and is basically a keyserver for certificates.
If the certificate is present, there will be a blue lock icon next to the recipient’s email address and iOS will allow email encryption.
If there is no certificate, or GAL can’t find one associated with the recipient, you will see a red checkmark instead.
Conclusion
That’s it. As you can see, encrypting an email in iOS requires a bit of work, mainly to download and install the certificate, but once you have it and have enabled Encrypt by default you can start by sending your first encrypted message and never look back to the time you didn’t have encryption on.
We hope that this article has been helpful in showing you how to send and receive secure and encrypted mail from iPhone and iOS devices.
Note that this was all about encrypting email with the iOS Mail. However, you can use an end-to-end encrypted email like CTemplar as well.
CTemplar: Armored Email is available on desktop for Windows, macOS and Linux, as well as mobile devices on Android and iOS via Google and Apple stores. It provides security for your email with 4096-bit E2EE OpenPGP encryption on the email body, attachments and subjects.
Also, CTemplar uses the hash & salt technique to protect your passwords, as well as Zero-knowledge password protection technology, which means that you will be the only one who knows your password. Not even CTemplar will be able to access your encrypted email and data.
Ready to take your email security to the next level? You can download and install the CTemplar app on your iOS for free or go to CTemplar.com and sign up for a free or paid plan account from here and take back your privacy.