If you are like most people (85% according to a Mobile Email Statistics report by 99 Firms), you are probably using your smartphone to check your email. However, with cyber threats around every Internet corner and potential data breaches (recently even several US federal agencies got breached, possibly due to a phishing email), it has become important to know how to better protect your email.
The best way to do that is by using encryption. Here is how you can encrypt your email on your Android device using CTemplar.
What is Email Encryption and How Does it Work?
Okay, but before we tell you all of this, it’s important to first understand what exactly is email encryption and how it works.
Simply put, email encryption (and this generally goes for any type of encryption) is the process of converting the contents of an email into a form that won’t be readable by a 3rd party.
This is done by encoding the readable text into symbols using an encryption key before sending the email to the recipient. On his side, the recipient then uses the same encryption key to decrypt and read the message.
This is the most common type of encryption that uses the same, public key to both encrypt and decrypt a message. As you can guess, while it’s safer than sending emails with no encryption whatsoever, using the same encryption key to both encrypt and decrypt the email has some obvious security concerns.
Because of this, encryption experts have introduced another, private key, needed to decipher the encrypted email. Unlike the public key which can circulate pretty much freely, only the intended email recipient should be in the possession of the private key.
How Can I Get Free Encrypted Email?
Okay, now that we covered what email encryption (and encryption in general) is and how it works, here are some good options to send an encrypted email for free that we would recommend.
FlowCrypt
If you want to use Gmail to send and receive sensitive emails, you should know that its regular TLS encryption will only protect your email messages while in transit, but not once it reaches its destination.
This is a serious vulnerability and one because of which we would wholeheartedly recommend not using Gmail for sending anything remotely confidential.
However, if you really have to, there are several plug-ins that you can use. One of them is FlowCrypt. Once you install FlowCrypt from the Google Play Store, next time you compose an email, you’ll see a new button instead of “Send” that now reads “Encrypt and Send”.
FlowCrypt allows you to send encrypted messages and attachments without having to know what PGP is or the difference between public and private keys, so it’s a very good option for average Gmail users.
Sendinc
Sendinc is a free, web-based service that allows you to send sensitive information through your Gmail or another email account. All you need to start using it is to sign up with your email and password and you can start composing secure emails without any additional software or plugins.
Your messages will be encrypted using a randomly-generated key which will be emailed to the recipient as a link and can only be decrypted with the key recipient’s encryption key. Note that not even Sendinc has that key and can’t decode the message without it.
Keep in mind that both the sender and the recipient need to use Sendinc for it to work.
When the sender sends the message, it will be hidden behind a link like this:
To open it and read the message, the recipient will need to create their own Sendinc account. Once they do, they’ll be able to open and read the message using Sendinc.
You can also upgrade to Sendinc Pro or Corporate for more features, such as choosing when the message will self-destruct (default is 7 days on the free version), or to get notified when the other side reads the message for example.
iSafeGuard
To use iSafeguard from MXC Software, you’ll first need to download and install the software package. This does mean that there is an additional step or two required compared to other free encrypted email service options here, but iSafeGuard provides top security encryption as well as digital signatures for everyone from individual users to organizations.
With iSafeGuard, you can encrypt emails, folders and files, sign them and verify digital signatures, plus there is a text editor you can use to free disk space.
Unfortunately, it only works with Windows, so Mac or Linux users are out of luck with this one.
CTemplar
Although solid, all of the options above to send a free encrypted email either require a plugin, a 3rd-party web-based service, or to install a software package.
Those are only short-term solutions.
CTemplar is an open-source secure email service that enables you to send encrypted email messages and attachments using the strongest OpenPGP encryption available.
The service doesn’t require any information on your part to create an account (including phone verification) to create an account. All you need is a username and password and you are ready to send encrypted emails.
In addition, CTemplar strips your IP from all metadata and logs, which means your outgoing emails are completely untraceable to you and thanks to Zero data protection CTemplar uses, no one can read your messages but you and the recipient.
Finally, your password is also protected using Zero-knowledge password protection, thanks to which you are the only one that can access your private keys and decrypt the data.
Looking for the best free encrypted email service? Try CTemplar: Armored Email.
Create Your CTemplar Email Account
First, if you don’t already have one, you will need to create your CTemplar: Armored Email account.
Don’t worry, that’s really easy to do. All you need to do is to go to ctemplar.com and on the top-right, you should see three red icons. Click the first icon (Sign Up).
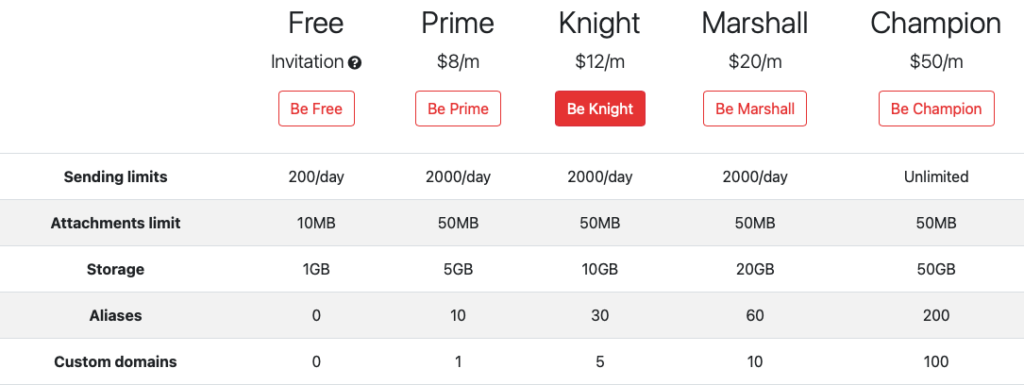
This will open a new page, titled Pricing. You can choose your account type here. We’ll go with Free for this one.
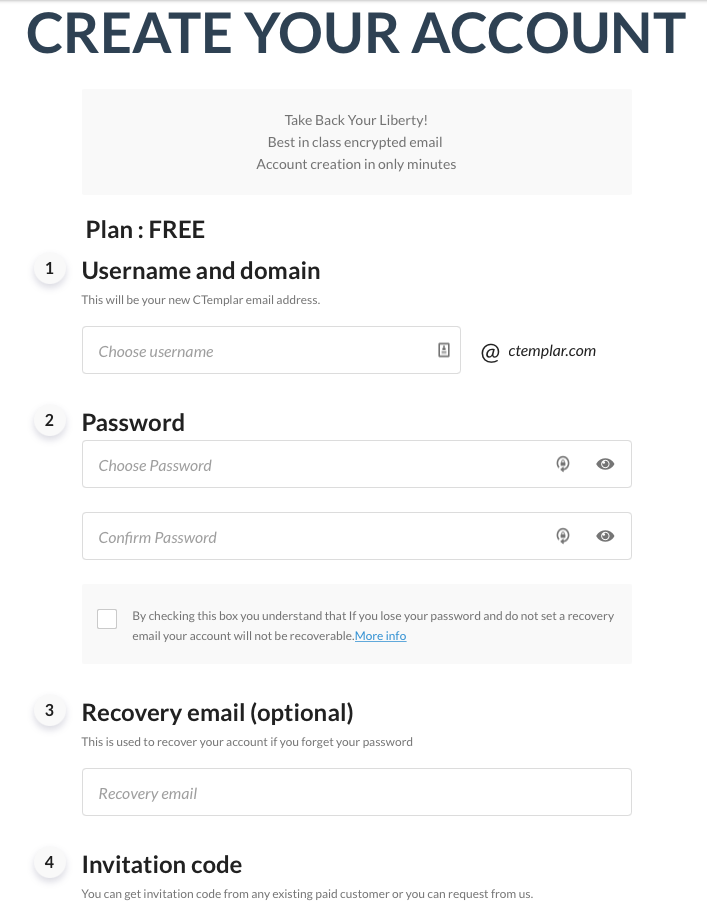
Click on “Be Free”, which will open a new page, where you can create your CTemplar account. Here, you will just have to enter your username and password. Note that CTemplar hashes passwords before sending them to the server for auth and sign-in, meaning that you’re the only one who knows your password (not even CTemplar will know it).
You will also need an invite code, which you can get by requesting one on r/ctemplar.
Install CTemplar on Your Android Device
Once you’ve successfully created your CTemplar email account, the next step is to download the CTemplar app on your Android device.
Like other Android apps, you can do that by going to Google Play, typing “CTemplar” and then clicking the “Install” button.
CTemplar has also recently released the open-source code for its mobile Android, iOS and F-Droid apps. You can find it on GitHub.
It will take a few moments for the install process to complete and once it’s done a CTemplar icon will appear on your screen. It will look like a mix between a shield and an envelope.
You’ll now be able to open and use CTemplar on Android.
Creating an Email and How to Send Encrypted Email Through Android
To send an encrypted email via Android using CTemplar, first tap the pen icon on the bottom right of your screen.
Next, create an email as you would normally, by entering your recipient, message subject and the message itself. CTemplar encrypts attachments, subject and body on all plans, including Free.
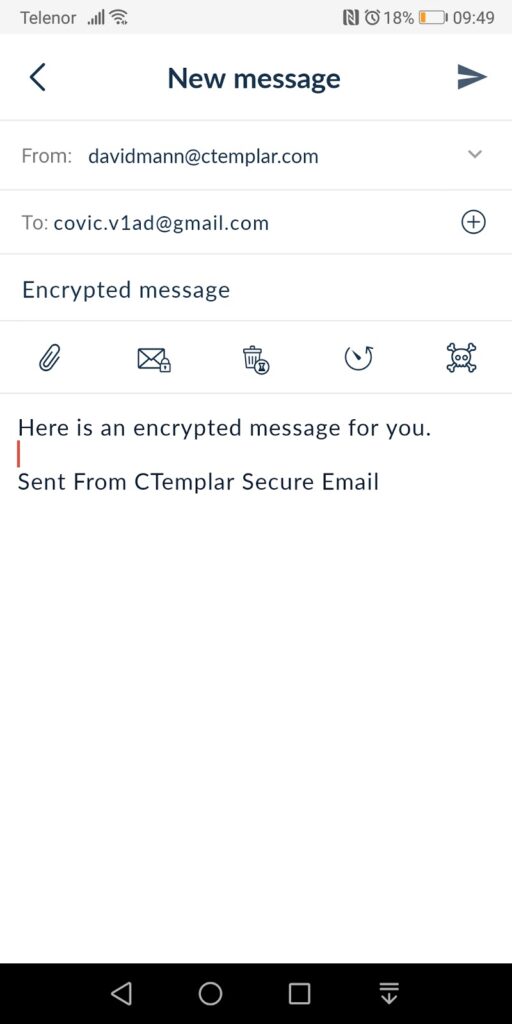
Note the five icons under the subject line. Click the second to the left (the one with an envelope and a lock). This will allow you to set a password and encrypt your message.
Messages on CTemplar are encrypted using OpenPGP protocol 4096-bit encryption. The message will then be encrypted using a recipient’s public key before being sent to the server.
Note that:
- If all recipients are CTemplar users, public keys will be retrieved from the servers and the message will be encrypted using those public keys, plus the user’s public key before being sent to the server. Once the recipient gets the message, they’ll need to decrypt it using a private key;
- If the recipients are both CTemplar and non-CTemplar users, the message will be sent in plain text to the server, where it will be encrypted for CTemplar users and sent as plain text to non-CTemplar users;
- If the recipients are non-CTemplar users only, the message will be sent to the server in plain text. However, if you want to send non-CTemplar users an encrypted message, you can do it by setting an encryption password, with a password hint.
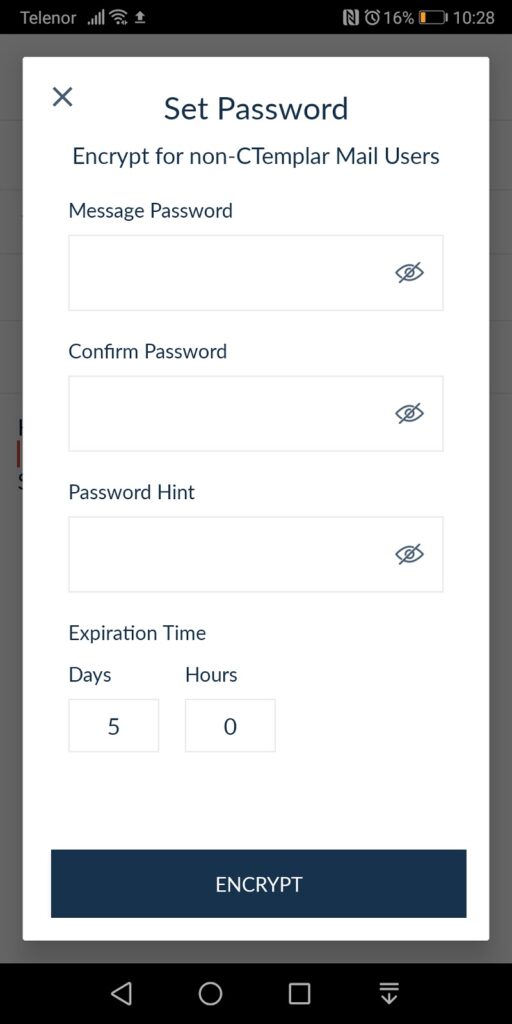
This is what we’ll do here. As you can see, you can also set the expiration time (the default is 5 days, 0 hours, but you can set it any way you like.
Once you’ve set the encryption password, you can send a secure email to the recipient.
Now let’s take a look at how to open an encrypted email on an Android phone.
How to Read Encrypted Email on Android?
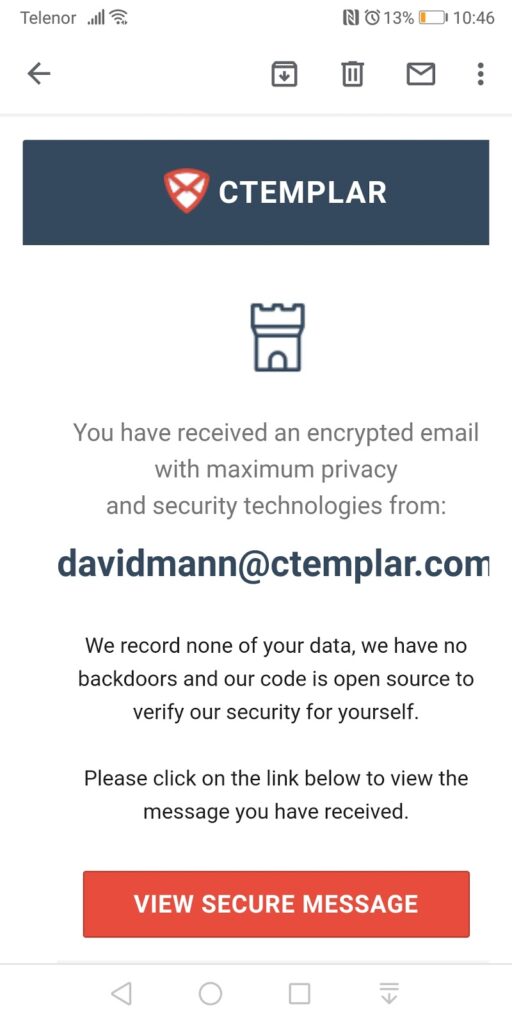
To open and read an encrypted email on Android, you’ll have to open your other email app (we used a Gmail account for this).
You should see the email from CTemplar in your inbox, saying “you have received an encrypted email”. Open it and tap the “View Secure Message” button near the bottom (you’ll also find your password hint under it).
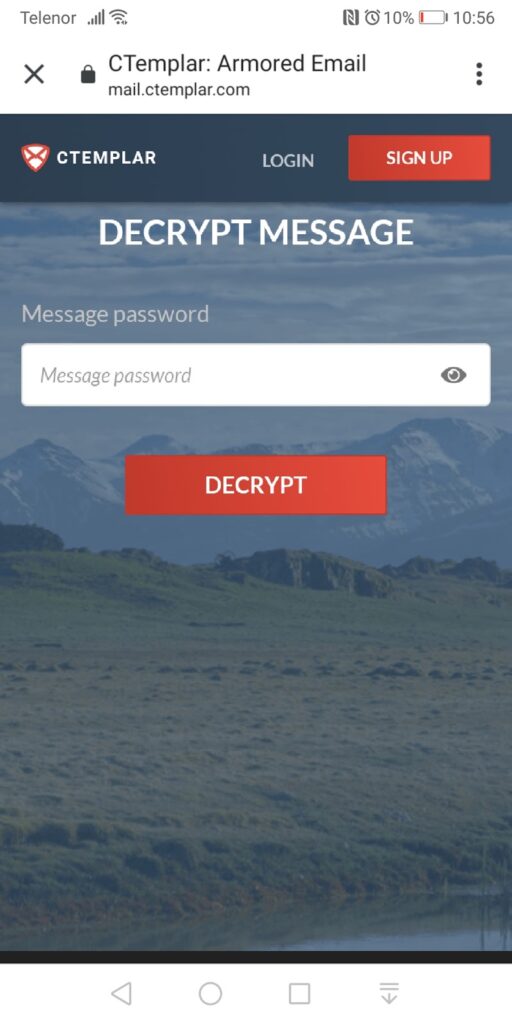
This will take you back to CTemplar, where you will be prompted to enter the message password in order to decrypt the message. Tap the “Decrypt” button and you’ll now be able to read the previously encrypted message.
Congratulations, you now know how to send encrypted email from Android and how to open an encrypted email on an Android phone using the most secure email service, CTemplar.
Looking for an easy and secure way to protect your email data? Sign up for CTemplar today.