When it comes to sending secure and encrypted messages, very few protocols come even close to Pretty Good Privacy or PGP encryption.
While PGP encrypt has been around since the 1990s, its use never spread much beyond the privacy-conscious and technically-savvy. For example, a typical Gmail user might not have even heard of PGP software, let alone know how to use it.
In this article, we’ll explain how to set up and use Pretty Good Privacy (PGP) so that you too can send encrypted messages with ease and protect your sensitive data.
How Public and Private Key Encryption Works?
PGP software uses public key cryptography, meaning that it uses public and private keys.
This is known as a “public key encryption”
How does a public key system work?
For extra protection, especially when sharing PGP-encrypted images or photos—consider how to protect photos online from unwanted access.
Let’s say you want to send an encrypted message to someone. You need their public key to encrypt the message.
However, let’s imagine that someone interrupts your message and has the public key. They still wouldn’t be able to read it, even with the public key.
What they would need is the recipient’s private key and that’s (hopefully) kept safe by the recipient, meaning they are the only person who can open and read the encrypted message or file.
How is public key encryption different from symmetric key encryption?
Public key encryption, or asymmetric encryption differs from symmetric key encryption in using a pair of keys, a private and a public key, to encrypt and decrypt data, while the symmetric key encryption method only uses one key to do both and is less secure as a result, but faster to process on the other hand.
How to Set Up PGP Encryption to Send Encrypted Messages?
Setting up PGP encryption can be a little daunting, but we’re here to show you that it’s not all that difficult if you follow these steps:
1. Install PGP Software on Your Device
First, you need to install PGP software on your device. There are several PGP clients to choose from depending on your operating system, but we recommend going for:
- GPG4Win – Windows;
- GPGTools – macOS;
- Engmail – Linux Ubuntu;
- OpenKeyChain – Android mobile devices;
- iPGMail – iOS mobile devices.
Installing any of these Pretty Good Privacy programs is easy. Simply download the newest stable version for your OS and then follow the instructions to install it just like any other program.
2. Generate a PGP Key
Installing a PGP program is only the first step, but it’s still not enough to use it. For that, you need to generate your PGP key. This is the part where a lot of people bail out on using PGP encryption, but it’s really not that difficult.
To show you how to generate a PGP key, I’ll be using GPGTools for macOS:
1) Once you install GPGTools on your computer, start the PGP software
2) In the Create a new key pair pop-up window that will appear as soon as you start the program
3) Enter your name, email address and password and click Create Key button. When creating a password, we recommend using a password generator by LastPass or another password manager tool and then saving it separately in it or writing it down somewhere you know you won’t lose it.
4) Once you click on the Create Key button, a short message telling you that your key is being generated will appear and shortly after another pop-up window will tell you that your key was created successfully. You can choose to upload your public key now by clicking the Upload Public Key button or skip this part by selecting No, Thanks!
5) Your key and its fingerprint will now be visible when you launch the GPG Keychain app on your computer.
You can find your keyID and fingerprint by right-clicking on the key and clicking Details. From here, you can also define “Ownertrust” (undefined, never, marginal, full, ultimate), as well as see the length of your key. Our recommendation is to use the RSA algorithm and key length of 4096 bits.
3. Backing Up Your PGP Key
Keep the PGP key and the password to it separate. For instance, you might store the key itself on a USB, a piece of paper, or a notepad and the password saved in a password manager.
Make sure you don’t lose your key, but at the same time, don’t make it too accessible for someone else to find it.
4. Create a PGP Revocation Certificate
The point of the PGP revocation certificate is that if you ever lose your private key or its password, or it gets compromised, simply use the revocation certificate to revoke the key.
This is useful rendering the PGP keys useless in case anyone gets their hands on them.
To create a revocation certificate, simply select the PGP key, right-click on it and select Create Revocation Certificate in the menu.
How to Use PGP Encryption?
Congratulations! Now you know how to create a PGP key, back it up and revoke it using a revocation certificate.
Now it’s just a matter of using Pretty Good Privacy.
When you go to your email client and create a message, when you right-click on it you’ll see a drop-down window. Select Services>OpenPGP Encrypt Selection.
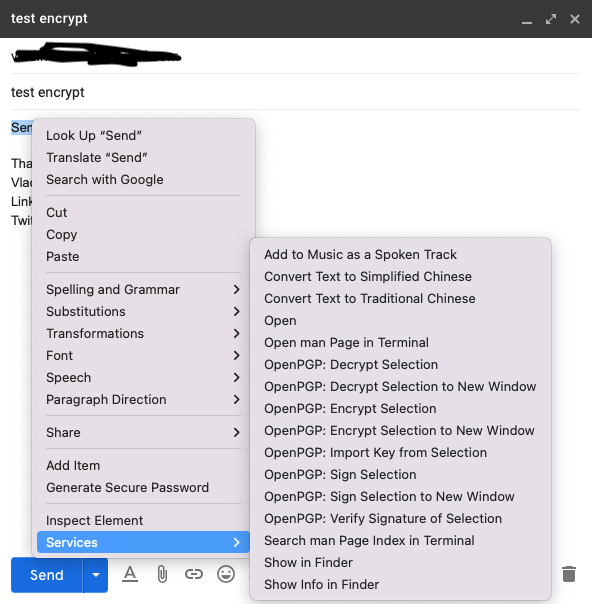
A new GPG Services window will open where you can select your recipient and send encrypted messages by clicking the Encrypt button.
Your encrypted message will look something like this:
When the recipient gets the encrypted message, you can share the key with them and they can right-click, select Services>OpenPGP: Decryption to New Window.
Once they select this, they’ll be able to read the original message.
How to Encrypt Files and Sign Them?
PGP encryption is not only for encrypting messages, but you can also encrypt files with it and sign them using digital signatures.
Encrypting files works the same as encrypting messages. All you need to do is rigs-click on the file, select Services>OpenPGP: Encrypt Files, enter the passphrase and, after a short time, your file will be encrypted.
To open an encrypted file, the process is similar. Right-click on it, select Services>OpenPGP: Decrypt Files and voila! The file is decrypted.
If we are referring to any of the macOS devices, they secure all the data very well indeed. So leaks are rare, because their systems are truly robust.
And for this, users love Apple so much, and businesses often use these devices for their employees’ work.
But let’s figure out how to safeguard files on other devices or throw another layer of protection on your MacOS docs.
If someone sends you an encrypted file, it’s still not a guarantee that they are who they say they are, even if they send it from a known email address.
This is what digital signatures will prove.
You have three options with your file:
- Encrypt file;
- Sign file;
- Encrypt and sign the file.
It’s best if you use the third option and both encrypt AND sign the file with a digital signature that will verify your identity. The file will then end with .sig or .asc depending on the PGP encryption program that you are using.
To verify a signature, right-click on the file or run the gig – verify file.sig command.
How to Safely Share Your Public Key?
Of course, to send encrypted messages, you first need the public keys of your contacts.
You can identify the PGP key with either a fingerprint (509E 7B97 D266 A283 DC10 5E6F 57ED 72A2 0BAC E776), a key ID (0x0BACE776), or a user ID (your name and email address). Both the fingerprint and the key ID are calculated from the PGP key, but since the fingerprint is longer, it’s better to uniquely identify the key.
You can then upload the key to the public key server, or use a service like Keybase.io to share the key securely. Of course, you can also share the key separately, like in another mail or via SMS, but we wouldn’t recommend that.
Conclusion
Pretty Good Privacy (PGP) is a great way to send sensitive files and other data to others, but it’s not very user-friendly. In a world where you can shop by tapping your phone once or twice or clicking on your laptop, sending encrypted PGP messages and using public key encryption can be hard.
However, knowing how Pretty Good Privacy works is important if you want to have email security and protect data.
You don’t have to use third-party PGP software to send encrypted emails! Sign up for CTemplar and get the best cryptographic security today!