Using SPF, DKIM and DMARC to Enhance Email Security
From time to time, hopefully, not too often, you might notice that your receiving mail server has failed to block a malicious email. This has most likely happened because the attacker has used IP or domain spoofing in order to cover their track and the receiving MTA (Mail Transfer Agent) failed to spot them.
In this post, we are going to talk about three important email authentication protocols that you should use to enhance your enterprise email security and [prevent sender fraud – SPF, DKIM and DMARC.
SPF (Sender Policy Framework)

SPF, or Sender Policy Framework, is an email authentication protocol that specifies which email server is allowed to send emails on your behalf.
The protocol has a two-fold function.
First, it ensures that your outgoing email messages are not marked as spam, thus ensuring deliverability.
Deploying spf dkim dmarc creates a three-layered shield that not only protects your domain reputation but significantly boosts inbox placement rates across increasingly suspicious email provider algorithms.
While most organizations implement these protocols reactively after deliverability issues arise, forward-thinking email marketers use them proactively as part of a comprehensive authentication strategy that pays dividends through improved engagement metrics and customer trust.
The technical implementation might seem daunting initially, but the real challenge lies in ongoing maintenance—especially for companies with complex email ecosystems spanning multiple third-party senders, international subsidiaries, and legacy systems that all need careful coordination to avoid authentication failures.
Second, it protects the user’s domain against spoofing.
Create an SPF Record
To ensure that your domain is protected against IP spoofing, you’ll need to create an SPF record. To do this, you have to:
1) Find which mail servers can send email from your domain to collect IP addresses
This can, for example, be your email service provider, or a 3rd-party mail server.
2) Create your SPF record
Once you’ve collected all IP addresses, the next step is to create an SPF record.
The SPF record will look like this:
v=spf1 ip4: 192.0. 2.146 ip6: 2001:0db8:85a3:0000:0000:8a2e:0370:7334 include 3rdpartydomain.com -all
Let’s break this down.
The first part, v=spf1, defines the record as SPF.
Next, we have the IP addresses that are authorized to send emails on your behalf.
“include 3rdpartydomain.com” shows which third-party domains can send emails on behalf of your mail server.
Finally, the all tag specifies what the ISP should do if it detects a mail server or IP address that is not in your SPF record.
In this case, there are three options:
- -all (Fail) – All unlisted servers are rejected;
- ~all (Softfail) – Unlisted servers are marked, but otherwise marked;
- +all – Allows any mail server to send email from your domain (do not use this tag!).
3) Publish the SPF record in your DNS
Once you’ve created your SPF record, you need to publish it in your DNS (Domain Name Server). What this does is enable mail recipients to request the SPF record.
The SPF record must be published in the DNS record by the DNS manager and to do this, you have to:
- Log in to your domain account;
- Find the page where you can update the domain DNS record;
- If you have multiple domains, click on the domain you want to modify the DNS record for;
- Open your DNS manager;
- Log in to your domain account at your host provider;
- Create a new DNS TXT record in the TXT field;
- Set the Host field to your domain’s name;
- Copy/paste the SPF record you’ve previously created into the TXT Value field;
- Leave Time To Live (TTL) as “default” or set to 3600;
- Publish the SPF record by clicking Save.
Congratulations, you’ve created and published your SPF record. Note that it will take up to 48h to become active.
Validate Your SPF Record
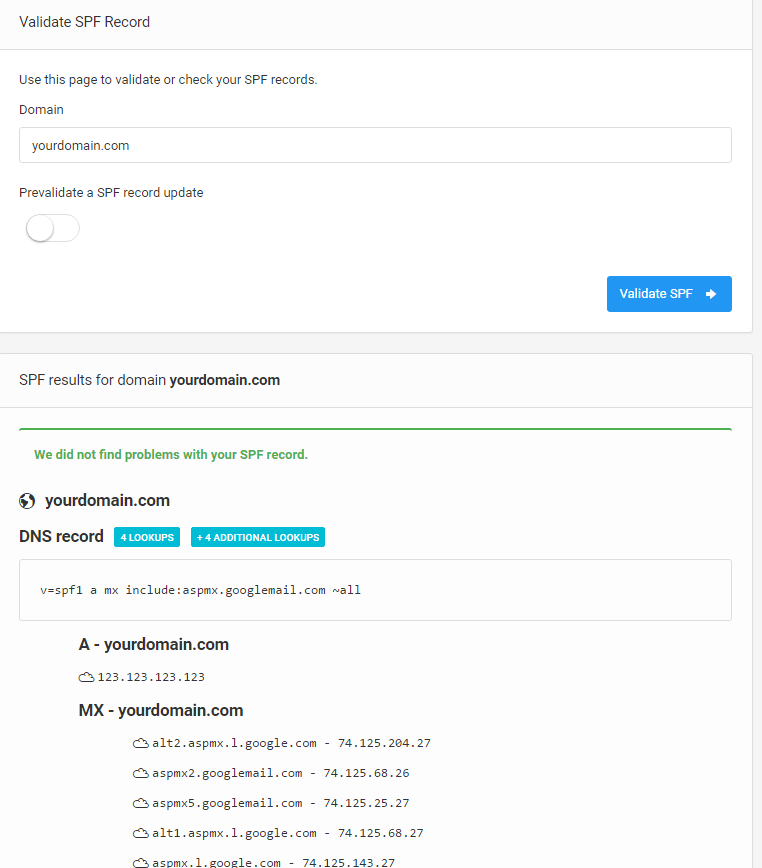
Once you’ve published the record, you need to test or validate it.
To do this, use an SPF Record Checker, like the one by DMARC Analyzer.
Simply fill in the domain name in the “Domain to verify” field, check the “I am not a robot” checkmark and click the Validate DNS button.
If everything is OK (the record is there), you will see a screen like this:
SPF Limitations
Despite being a great method for email authentication, Sender Policy Framework has certain limitations.
Namely:
- It won’t work if the email has been forwarded. This is because the “forwarder” is now the “sender” and this breaks the SPF;
- It won’t validate the “From” header, but instead “envelope from” to find the sending domain;
- There’s no reporting, so it’s often difficult to maintain.
DKIM (DomainKeys Identified Mail)

DKIM or DomainKeys Identified Mail is another important email authentication method, whose purpose is to detect email spoofing and that way prevent email spam and phishing attacks.
In other words, DKIM tells the receiving mail server if the email was really sent and authorized by the domain owner or not by giving it (the email) a digital DKIM signature.
The DKIM signature is not visible to end-users and instead, its validation is done by the server.
How Does it Work?
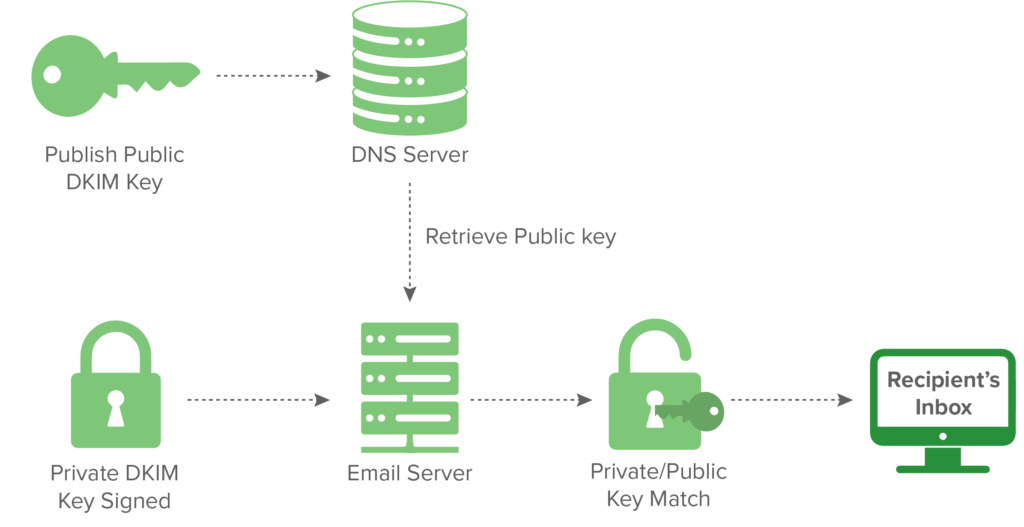
So how does DKIM work in the first place?
Once the receiving mail server gets the email message it checks for the DKIM signature and the sender’s public DKIM keys in the DNS. If the DKIM keys are found, they are then used to decrypt the DKIM signature and this value is compared to the one from the received email. If there’s a match, the DKIM is considered “valid”
Here’s a visual graph of how this works:
Set up the DKIM Record
Note that you don’t have to set up the DKIM record as most email service providers will use a default DKIM.
For example, Gmail uses the following DKIM domain key to sign outgoing messages:
d=*gappssmtp.com
If you opt to set up your own DKIM, you’ll have to:
- Generate the domain key for your domain;
- Add the public key to its DNS record;
- Turn on DKIM signing.
Validate the DKIM Record
Once you’ve set up the DKIM record, you can validate it using a DKIM record Checker.
- Enter the Selector in the left text field (for instance, Google);
- In the right text field, enter the domain you want to verify (for instance, Domain.com);
- Check the “I’m not a robot”;
- Click on the “Validate DNS” button.
If you’ve correctly the DKIM record, you should see a green message reading:
“This seems to be a valid DKIM record.”
And if not, it will say (in red text):
“We could not detect a DKIM record with the specified selector on this domain.”
DMARC (Domain-based Message Authentication, Reporting and Conformance)

Finally, we also have DMARC, or Domain-based Message Authentication, Reporting and Conformance.
DMARC is an email authentication method that allows email administrators to request a report from the mail servers that get messages from your domain and authenticate the email sender.
The Domain-based Message Authentication report is a public record published in the DNS servers and everyone can access it. It contains three policies:
- P=none – Monitors the user’s email traffic without taking additional actions;
- P=quarantine – Sends any unauthorized mail to the spam folder;
- p=reject –Rejects any unauthorized email and prevents it from being delivered to the user’s inbox.
DMARC is based on the results obtained from SPF and/or DKIM results, so for it to work, either SPF or DKIM authentication needs to work and the DMARC record needs to be published in the DNS.
An average enterprise email user, for example, often can’t make a difference between a real message and a spoofed or fake one. This is why DMARC can help both senders and recipients to improve their email security solutions and protect them from abuse.
This provides three benefits to the end-user
- Protecting their reputation by preventing unauthorized users such as hackers, to send emails from your domain;
- Increases the visibility of your email by informing you who sends mail from your domain;
- Improves the email ecosystem by providing a consistent policy for unauthenticated messages and making email more secure.
Conclusion
As you can see, SPF, DKIM and DMARC are all important email authentication methods in preventing sender address forgery. This is why it’s important to understand them as best you can and we hope this article has helped you with that at least a little bit.